Tuesday, October 30, 2012

Cauliflower Pizza Crust

So I am taking a quick break on pumpkin and posting on Pizza!! Don't worry pumpkin fans, I have about four pumpkin recipes I am making this week since I am so obsessed and have three parties I am going to where I need to bring some Paleo goodness. So of course I am bringing something pumpkin. So most people when they decide to go Paleo have the biggest problem of giving up pizza. Who doesn't like bread with cheese, too bad I'm lactose in tolerant and gluten and I don't get along...damn you pizza and your tastiness. I had some friends that really love pizza and told me they never could give it up so I started searching for a crust recipe. Since usually the crust is super processed, no nutrient, gross white bread, that somehow tastes good; I had to search for alternatives. 

I have made an almond crust recipe before and it actually turned out pretty good. So I was originally looking for a new recipe with that when I came across a Cauliflower Crust Pizza. Hmm, sounds gross, but it got great reviews.....so why not? So all the recipes I had added some sort of cheese to the recipe. I decided to omit, but I would say go for it to make it even more tasty!

RECIPE: http://detoxinista.com/2012/01/the-secret-to-perfect-cauliflower-pizza-crust/

INGREDIENTS:

4 Cups Raw Cauliflower Rice
1 Egg, Beaten
1/3 cup soft goat cheese or parmesan or mozzarella 
1 teaspoon dried oregano
Pinch of Salt

So go ahead and preheat your oven to 400 degrees. Start by making the Cauliflower into rice. I just put it in my food processor until it was rice consistency. After done with that it is time to cook the rice! Put about an inch of water in a pot and bring it to a boil. Add the 'rice' and let it cook for about 4-5 minutes.  Now the most important parts!!! Strain the rice after its done then transfer to a dish towel and squeeze all the water out. Check out the website above, they have great pictures! 

Next, mix the rice, egg, cheese, oregano and salt. After it is mixed really well together (and won't seem like its going to work at all) it is time to form it into a pizza crust. Press the dough on a baking sheet lined with parchment paper making the edges a little higher and the dough itself around 1/3" thick. 


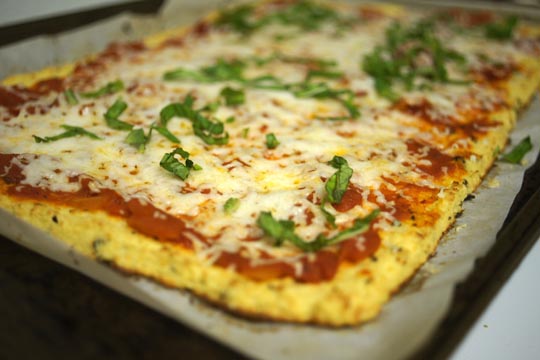
Bake for 35-40 minutes at the 400F. The crust should be firm and golden brown when done. Now just add any toppings that you would like!! I did spinach, mushrooms, grilled chicken, and whatever else I could find in the fridge. Then throw that back in the oven for 5-10 minutes. EAT IT, because it is a tasty alternative to regular pizza. I even had some for leftovers for a few days. I feel like a little more experimenting with the crust will be good since its hard to actually have a slice, you more have to eat it with a fork and knife, but I still enjoyed it. You can't even tell the crust is actually made with cauliflower.


Of course regular pizza just is amazing, but knowing the way it makes me feel and all the ridiculous ingredients in it I can't pronounce or know what they are, I'll take this crust! Enjoy :-)

Thursday, October 18, 2012

Pumpkin Granola

Fall in Colorado=amazing
So fall is here!! Which means all I do is eat stuff with pumpkin and wear boots. Ok I lied, I do more than just that, but those two things are my favorite. For the last week I have been visiting Chicago, spending time with my family and friends. For those that don't know, I grew up here, so it's nice to come home from time to time, but I am already missing Colorado. One of the reasons I came home was to teach my parents the Paleo diet and visit CrossFit gyms! I just love meeting people and one of the gyms I was looking forward to visiting  was CrossFit Posted! I met the guys that were going to open the gym at the CrossFit games in June. They had not opened it yet, but talked about it and the gym just happened to be right by my parents house. What are the chances! They have been open now for about two months and getting new members each day. If you live around Brookfield, IL you HAVE to check it out. Jason, Matt, and Mike are great guys that will share their passion of CrossFit with you. Thanks for letting me WOD and I am SO close to getting a muscle up, thanks to them. :-) I also got to talk nutrition with a lot of people, which is another one of my passion since education is the most important part of it. I also got to visit Windy City CrossFit, (in Lakeview downtown) where my friend Megan goes. Great gym and amazing good looking people. Super nice to me and loved the WOD even though it involved running.  CrossFit just has an amazing community and I love meeting more people that share the same obsessions of me each time I travel to a different place :-). 


So with the fall here, I am now obsessed with pumpkin. I looked online to see what I could find and immediately was drawn to Juli Bauer's pumpkin granola recipe. I need something I could eat while I went hiking and for a snack around the house. The fact that it has pumpkin in it was a super added bonus. The ingredients were not hard to find at all as I got them all from whole foods for a reasonable price. 

RECIPE: PUMPKIN GRANOLA

INGREDIENTS:

  • 1/2 cup sliced almonds
  • 1/2 cup pumpkin seeds (pepitas)
  • 1/2 cup pecans, chopped
  • 8-10 dried dates, pits removed, then chopped
  • 1/2 cup pumpkin puree
  • 1/3 cup coconut oil, melted
  • 1/3 cup unsweetened shredded coconut
  • 1/3 cup maple syrup (I used honey)
  • 1 teaspoon vanilla extract
  • 2 tablespoons cinnamon
  • 1 tablespoon nutmeg
  • 1/8 teaspoon ground cloves
  • 1/8 teaspoon ground ginger
  • pinch of salt

Preheat your oven to 325 degrees. Then in a bowl add your pumpkin puree, coconut oil, maple syrup(or honey), vanilla, and all spices. Then add all the nuts, seeds, coconut, and dates to the mixture until its all mixed and looks and smells like amazing. Spread it over a oiled up parchment paper and throw in the oven for around 30-35min. I mixed it around after about 15 minutes and kept my eye on it. It is really easy to burn, but just wait until it looks brown and crispy. Should be around 30-35 minutes. Take it out and LET IT COOL! Its important so it can stick together and harden up. The spices and combination of everything else is just amazing. I ate some by itself and some with a little coconut milk. It was fantastic and it lasts forever. I stored it in an airtight container in my fridge and had it for at least a week. 

Enjoy! I ate it all so fast that I didn't take any pictures. Way to go Stef, now people aren't even going to believe you made it. Well I did and you'll be happy when you make it and eat it. Just send me a picture and I'll put it on the blog :-). Until then I'll just use Juli's since mine looked exactly the same....believe me. 


Monday, October 8, 2012

Avocado Stuffed Burger

Haha So true...pick your battles
Holy Moly!! It has been way to long since I have posted and I have cooked so many yummy meals. So I thought it is about the time to get back at it and share everything that I have made. Paleo is such a funny word. I find myself hesitating before saying it a lot of times. I think this is because people associate Paleo with CrossFit, not eating the things they want, and judgement. So now when I talk to people about nutrition I talk about eating real food. Paleo is all about eating real food and learning why you should eat it, you really do not even have to put a name to it. It is funny how I mention Paleo to people and they are immediately against it, bash it, make a million excuses why they cannot do it, and don't listen anymore. Though if I talk about eating real foods and how grains, soy, legumes, sugar, etc are not good for them, they seem to listen. I wish people wouldn't judge that much until they try it. I am also one of those nutritionist that would never push it on anyone! I will educate you and show you the way and then it is up to you whether you decide to believe in it or not. I'm hear to help, inspire, and get you healthy, I'm hear for YOU, not me.

A great example are my brother and dad. They always made fun of me and the way I ate. Saying I was so high maintenance and should just eat. Well I look at food at a different way then them and they just did not understand. All of a sudden though they saw the improvements that I was making with myself and changes in my body and new that something must be going right and CAME to me! They now both have respectively lost 10-15 pounds. I am proud and can not wait to teach them more recipes and help them understand why I love this type of eating.

Alright enough with the paleo crap talk, right?? If you are reading this blog you probably already eat Paleo, but whatevs, I'm sure you can relate! So awhile back I had some grass-fed burgers and avocado. Sounded super boring to me...until I found this recipe by George over at Civilized Caveman Cooking Creations that combined the two! Genius!!

This is what they are supposed to look like!
RECIPE:  AVOCADO STUFFED BURGERS

INGREDIENTS: 

  • 2 Lbs GrassFed (IMPORTANT!!!) Ground Beef 
  • 2 Avocados
  • 1 Cup Sun dried tomatoes, chopped NO OIL
  • Juice of 1/2 Lemon
  • Zest of 1 Lemon
  • 2 Tbsp Black Pepper
  • 2 Tbsp Sea Salt
  • Bacon Fat (Optional)
Super easy ingredients, I had all of these (even the sun dried tomatoes) in my kitchen. I don't really like sun-dried tomatoes so not sure why I had them. I put like 1/3 cup in...did I mention I don't really like them? 

1. So fire up that grill! You could sauté them too, but I love the grill, I cook everything on it. 
2. First, smash up the ground beef with the 1 Tbsp sea salt and black pepper, and zest of 1 lemon. 
3. In a separate bowl smash up the avocados with rest of sea salt, black pepper, sun-dried tomatoes, and lemon juice. BAM. I added some cilantro...I LOVE CILANTRO. 
4. Ok so here is the trick, making two thin, small burgers that you can stack to make one burger that hopefully isn't bigger than your head. I definitely struggle at this, I couldn't get it to stay together the thinner I made it. I finally someone figured it out for the most part. 
5. On one burger top it will the avocado mixture and then take another burger and put it on top and pinch the edges. I had a really hard time getting the avocado mixture not to spill out. Just keep playing around with it until all burgers are 'stuffed'
6. Go ahead and throw those suckers on the grill, around 6-8 minutes a side and drizzle some bacon fat on there if you have...amazing.
7. After they are done, let them rest for about 10 minutes and dig in. There wasn't nearly enough avocado inside it so I topped them with the rest of the mix I didn't use. 

This is what mine looked like...not as good as his, but still tasty
Super tasty and super easy. Two qualities I love in recipes. I paired these with a sweet potato chips and sautéed some spinach! 

Excited to be back making yummy recipes or not so yummy recipes...but haven't ran into one of those yet :-).